
We used new media technologies throughout this project, using technologies that we had used previously, and some that we had never used before. We used different cameras compared to last year, and learnt how to use programmes such as Adobe After Effects and Wix. We also exploited the use of social media and web2.0, using websites such as Facebook, Twitter and Tumblr; all of which have been a lot of fun as we could roleplay as the band!
Research
For research we used the internet a lot, using websites such as YouTube and Google to look at real music videos, websites and album covers. YouTube was really helpful for research due to the related videos/suggestions on the side, meaning that we could watch similar videos/ videos in the same genre easily.

Planning
When planning our shoots, ideas and group meetings, we contacted eachother through Whatsapp, a new app on the iPhone, Blackberry and Android. This meant that we could have one group message and contact eachother immediately, on the go and for free. This was really effective as this made planning and communication much easier.

We also used Twitter and Twitlonger for planning, say if we needed to link eachother anything, or if an idea was really long (as it's faster to type on a keyboard than on a small phone). As girls who all use Twitter daily, this was also an effective and fast way of communication using new technology.

Construction
We used many different types of new technology for the production of our music video, during the shooting and editing stages. When shooting, we used a new camera, the Sony HDV 1080i 3CMOS for the first time, and also learnt how to use different types of lighting. For our narrative sequences we used floodlights and for our performance sequences we used the new lights in our Seward Studio at our school.
During the editing stages we used Adobe Premiere Pro CS4, similar to our project last year. However we also used Premiere to cut the song, which we didn't do last year. The original song was 3:46, but we were able to cut it seamlessly to make it 3:03, so that it would be the right length for our video.
After editing our whole sequence in Premiere, we decided that we wanted to colour grade it using After Effects. We learnt how to use Colour Finesse, Curves and Vignettes, shown in the video below:
We also used a lot of new technologies to create our ancillary texts; our website and album cover. To make our website, we used the programme Wix, something none of us had ever used before. Some of us had already had a little experience working with html on past blogs, but none of us had tried to create a website using Wix and flash. We found at first that Wix was great: we could easily add pages, text, images, links and videos. However, during the actual prcoess of making the website, we realised that it was not as easy to use as first presumed. Technical difficulties with the internet at our school meant that we always had to upload photos to image servers such as Tinypic and use the html to add photos to our website, and the desired effects and transitions were not always how we exactly wanted them to be.
However, by the end, we created a website we were all proud of. I personallu love the fact that Wix allowed us to add widgets to Twitter and easily create photo galleries, and the use of flash meant that we could create a moving enter page. I was especially happy with how we created a mailing list sign up (using a html we found from Google) and a working QR code. Below is a video of the QR code in use, and the mobile website we created to go with it, also made on Wix:
As mentioned before, we also created Twitter, Facebook and Tumblr accounts to make our band seem more real and further exploit the uses of web2.0 and social media. It was a lot of fun roleplaying as the band and making up fake stories; we even got a few bands and advertisers following our account!
Facebook: http://www.facebook.com/thexyzs
Twitter: http://twitter.com/#!/thexyzs
Tumblr: http://thexyzs.tumblr.com/

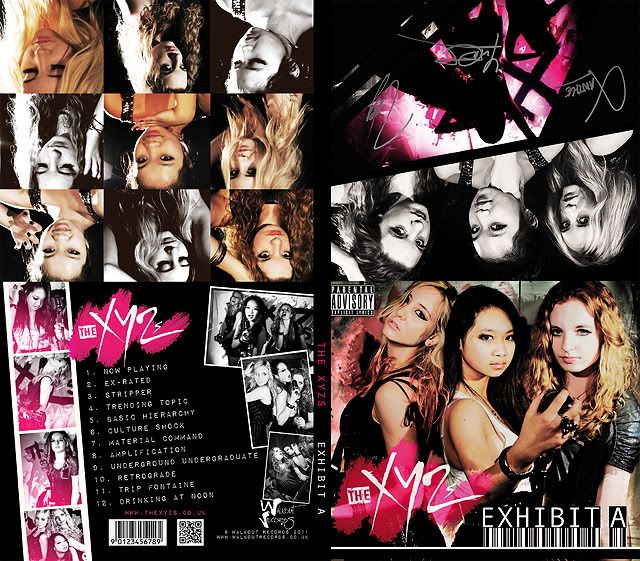
Making the album cover also allowed us to use new technology too. In all the previous years of using Photoshop to create images, we had always used CS4, but this year our school had recently installed CS5. There were new adjustment layers such as 'Vibrance' which I learnt to use, as well as learning about rulers and snap guides to help us lay out our digipacks. For example we used the guide lines (the blue lines, as shown below) which helped us with the layout of our album covers, as we were told no text was allowed to exceed them. This is because there was a high chance that the printer would cut them off, so it was better to keep inside them to be safe.

Photoshop allowed us to create real looking album covers easily, with adjustment layers such as curves, brightness/contrast, selective colour and gradient maps, some of which I had used before and some of which my classmates taught me how to use. The clone tool also came in handy to help to airbrush our faces and create that flawless popstar look, and various brushes helped us to create that rougher, edgier look we were going for.
We also used websites such as dafont and abstractfonts to download the right fonts that we wanted, including the barcode style font for 'Exhibit A' and the Dymo-label-style font for the track listing on the back.
Evaluation
To evaluate our project, we needed feedback from our audience. So to do this, we again exploited web2.0 and social networking. We created a survey, but unlike last year where we had a screening and handed out surveys that they could write on, we used new technology. This year, we created an online survey using SurveyMonkey, and then sent out the link of the survey and the YouTube video to our audience, via social networking sites such as Facebook, Twitter and Tumblr. We thought that this would be a better process as it was faster, more efficient, easy to use, and it meant that we could target a large reach in seconds.

We also used the website whatismyipaddress, which was very handy to see where the people who had taken our survey lived. From SurveyMonkey we could see the ip address of the person, which we then put into whatsmyipaddress and could find the city they came from. This was very useful to see where our audience had come from, and to see who we were targeting.
We could also see similar stats on YouTube, which showed us where in the world people had watched our video, and which audiences the video was most popular with.

No comments:
Post a Comment